Integration Host
Part one can be found here
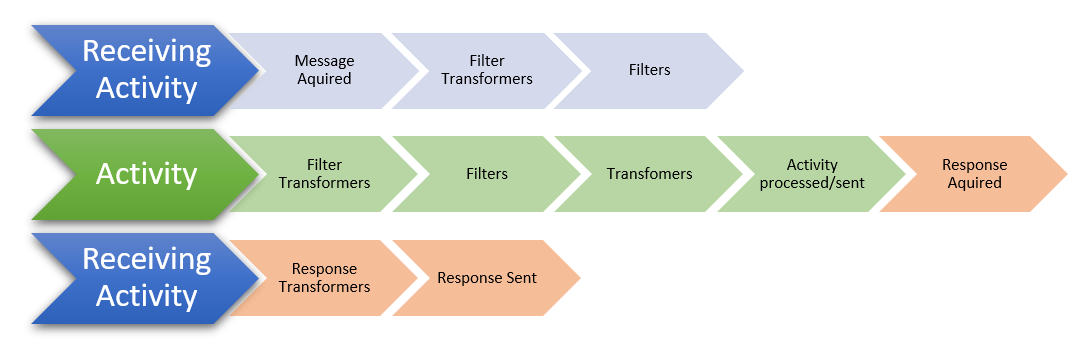
Let’s consider this workflow for a bit. It is made of two activities, the first which receives the data from a file, then a second that builds a new message out of that data and writes it to a file. These are quite big steps that are hiding some of the complexity. Perhaps not a big deal in a simple mapping like this, but what if that data required more processing to convert. What if it needed logical steps like conditions and loops to process the data. This is where the concept of transformers come in. Clicking on an activity’s transformers tab shows you the transformers window. One way to think of transformers is as a more details focused workflow that runs inside each activity just before the data is written, performing all the step required to map from one activity to another.
The centre panel lists all the steps that will be taken to map the data. You can see here that we already have a small collection of transformers. These, are mapping values from the incoming message into the variables we added into the message earlier. As we dropped the items into the message template the system was behind the scenes creating the transformers that bound the fields into the variables for us.
Clicking on the transformer shows how the variable named ‘Patient ID Number’ had it’s value set form the PID-2.1 field from the first activity.
I could have done this entirely manually too. If I click the “Add Transformers” button and select the “Set Variable value” it will add another transformer. I’ll call this variable “Sex” and then select the source to be the first activity, and enter the path PID-8. Now I can go back to my activities message template, type comma, and add in the variable by right-clicking and inserting it {I could have just typed it too}. The point I’m making here is that although the workflow designer has helpful shortcuts it’s still just creating logic steps that transform the data.
Let’s now expand on this with another example that digs a little further, particularly into Transformers. This time we’ll spin things around a bit and construct an HL7 Message as if we have a system that needs to pass data to another medical system.
I’m going to create a new workflow for this called “Example Two”. The plan is to receive our data, process it into HL7 and send it on. There are lots of ways to do this. Commonly a Web Service receiver is used (either SOAP or REST) due to their ability to respond to the caller, notifying of success or failure. But I’m going to keep things simple and stick with the Directory Scanner.
I will, however, step up the data complexity by including some observation results. CSV won’t cut it anymore as I want to bring in hierarchical data, so XML or JSON is a better option now. Download Samples here.
You can see It’s just the same basic patient data as before, but now includes a list of ‘Results’ for us to loop over and include in the HL7. Note that there are two different devices in the results, we’re going to filter out the MED2 results leaving only the MED1 observations.
Firstly, we’ll name the activity {Directory Scan}, and configure it to scan an incoming directory, {c:\ExampleTwo} set the message type, and create the message Template by pasting in our message.
Next, I’ll add a new activity, and I’ll stick with the TCP sender this time. I’m happy with all the defaults, noting that I’m sending locally to port 22222. I just need to provide a Message Template. When you're integrating with another system, they’ll probably have a sample Hl7 message for you to use to paste in here, so I suggest using that as your template. I’m going to build my own simple message, so I’ll start with the same HL7 message from the previous example as my frame.
I’m going to get rid of all the segments I don’t need, so I now just have the Message Header and Patient Info segments.
I’m going to change the message type at MSH-9 to be ORU^R01 as I’m sending data to another system in this example.
I’ll set the date of the message to the current time, and format it to the HL7 date format, plus I’ll put in the WorkflowInstanceID system variable to use as the message control ID.
I could use the same techniques from the previous example to bring in the patient’s details, but because we want to loop over the results we’ll do our mapping in the Transformers, as they enable us greater flexibility.
You can see here that we now have both the Source and the Destination tree populated with our deconstructed message templates. The Destination tree is always the current activity; it’s the message that we are manipulating with the transformers. The Source tree provides a list of places we could get data from. You can see that both the first activity and variables are available to me, but if I had other activities before the current one, querying a database or calling a web service for example, then their results would be listed here too.
The general goal of transformers is to map data from the source tree into the message of the destination tree. The individual transformers are listed here, and their details show here.
I can simply drag the Patients id across to the PID-2 Patients ID, and it creates a new transformer for us. We can then add the others, First Name, Last Name and Date of Birth. We can even adjust the formatting by right-clicking on the binding down here in the details and converting our ‘Date of Birth’ to the HL7 date format.
To loop over our results is going to require a ForEach Transformer, so click the ‘Add Transformers’ button {or right click on the transformers list} and select ForEach.
We’ll set it to loop over each of the results {Bind to the actual repeating node, not the container}, and we will create a new OBX segment for each one using the “Append Segment” transformer.
I can build up the appended Segment by typing in the text and adding variables where I have values to display. I’ll use the systems ForEach counter variable as the Set ID like so.
Now I’ll bring the observation and value, and create them to variables too. {Dragging a source item to the transformers list creates a variable populated with it}
{New transformers are added below the selected one}
And I can now insert these also into their location within the OBX. Great.
I mentioned earlier we’d filter out the Med2 device records. So let’s create a condition, and we’ll bind that to the Device field and set it only process the MED1 devices. Then put the Append Segment into the condition, so it only executes when the condition is met.
If we now go back to the activity, we can see that the transformers don't alter the message template at design time, but at run time it’s going to swap out the mapped values. Values that aren’t mapped are just going to be written out as they appear in the message template, so you’ll want to remove any junk data that you don’t have mappings or literal values for.
I’ll save the workflow, and we can see in the main screen that the workflow is up and running.
Heading over to the file system, I’ll copy the Example Two sample file to the processing directory, then head back to the Client to view the results.
Things are going wrong here, that red counter is showing errors, let’s take a look at the logs and see what is going wrong.
“No connection could be made because the target machine actively refused it 127.0.0.1:22222”
That’s right, we’re sending the message to port 22222, but there isn’t anything there representing the third party. Integration Host doesn’t give up on this type of error. It’s assuming your networks gone down and is just trying over and over to get the message through.
No worries, we can just create a simple TCP receiver workflow to simulate the third party. New Workflow. All the defaults are exactly what we need. The port is the same, so all we need to do is ‘Save and Close”
That’s fixed it. We can refresh the logs on our Example Two workflow and see that our messages have been processed correctly now.
{blue is completed, red is error, green is in-progress}
Looking at the log details on our third-party simulator workflow shows the hl7 message with all its fields correctly bound and with only the MED1 observations listed. Fantastic.
{Alerts and Scheduling]
Click the HL7 Soup icon to open up the settings dialog. Here you can create alerts that will email an administrator if one of these system events happen. You just need to configure email settings and a message, and that is it.
Scheduling enables workflows to be started at specific times of the day and week. For example, we can set our directory scanning workflow to process all the messages at 1 am in the morning, reducing server load.
When doing this, you should also change the workflow to “stop once all files in the directory have been processed”.
We have a pile of tutorials on our website to help with all sorts of scenarios and get up and running quickly and easily.
Also, take a look at our partner program for great discounts available to resellers, plus our free developer licenses to build and test your integrations.
HL7 Soup’s Integration Host will make Integrations faster than you ever thought possible. A truly cost-effective solution for your integration needs.